Dairy & Gluten-Free Quiche
This post is also available in / Esta entrada también está disponible en ESPAÑOL (SPANISH)
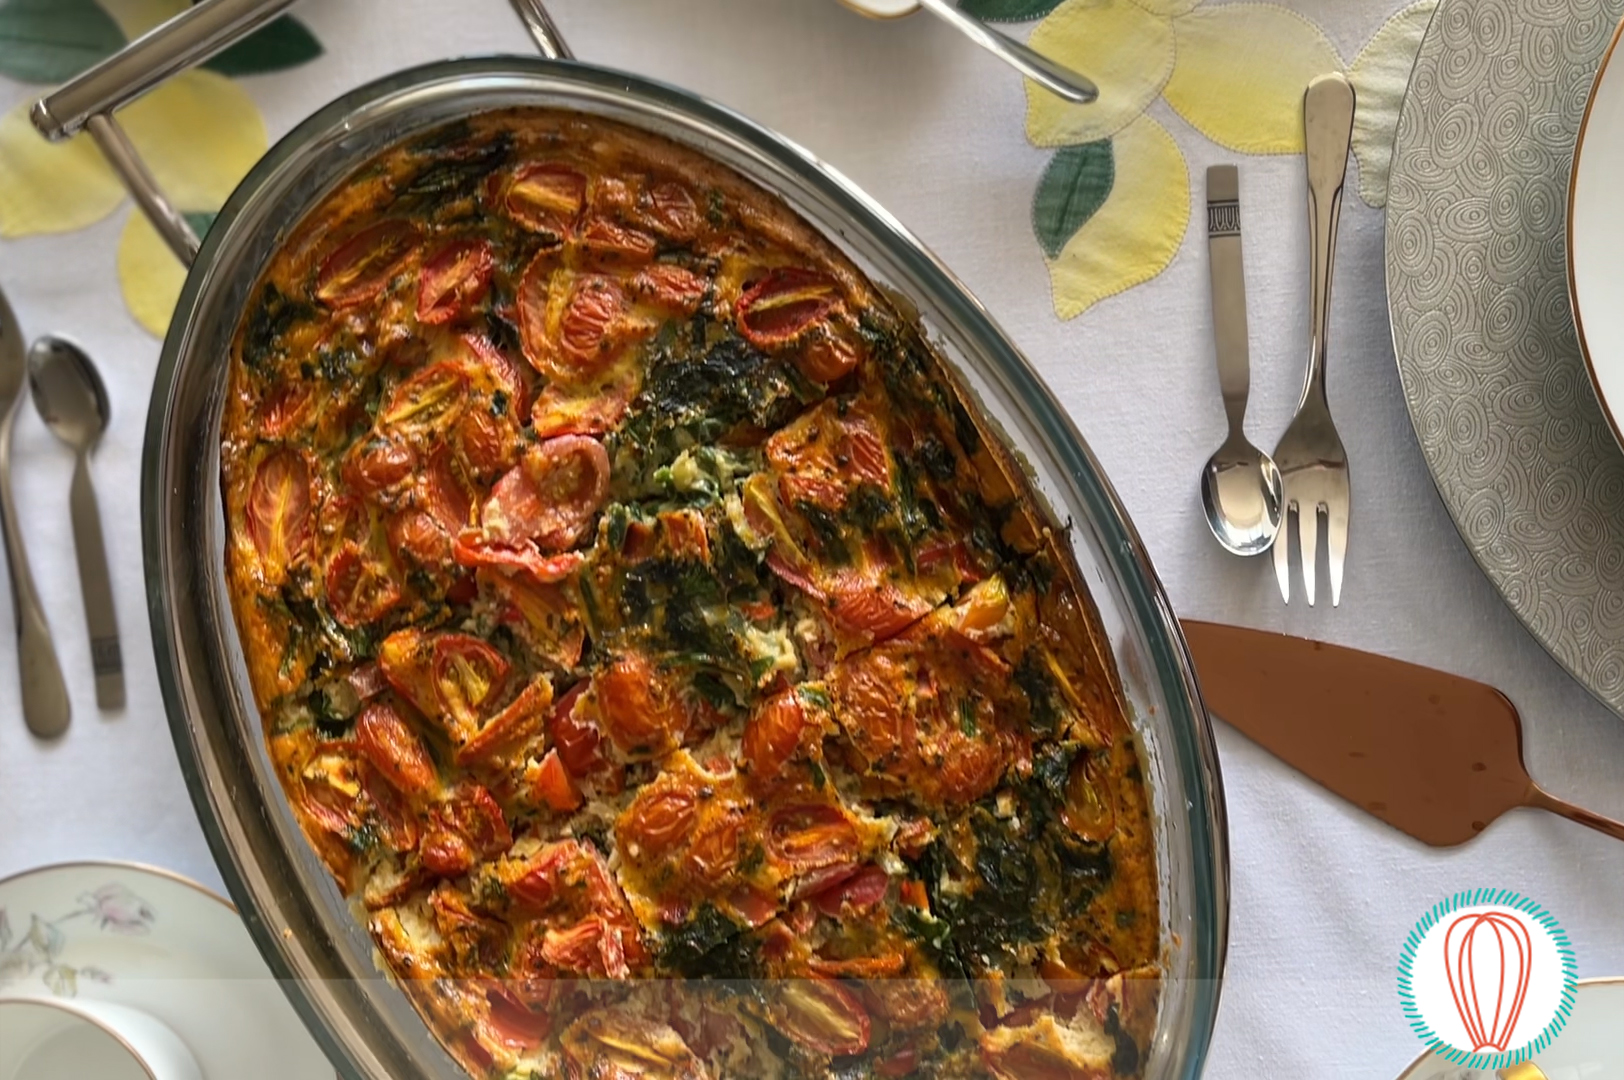
Along with my mom, we were hosting a tiny baby shower, so we decided to prepare everything we were serving at home. Since we had two guests that have dietary restrictions, one has a gluten-free diet, and the second one had a dairy-free diet. So, I tweaked two recipes to make one single winner: A gluten and dairy-free quiche, the crust prepared with gluten-free flour, and the filling made with non-dairy milk.
We paired this quiche with a salad inspired by a recipe found in the book In Jeanie’s Kitchen, Made with Love. We also served along with fruit, granola (prepared with gluten-free oats), and serrano ham slices to contrast with its salty twist. For dessert, we had meringues, canillitas de leche, and rice quesadilla squares.
We asked you over IG if you wanted more dietary sensitivity recipes, and you said yes! So we got you covered. We will be sharing some of our recipes that can be made to suit dietary restrictions, and share some substitutions.
This quiche is great to make ahead of time – I baked it the night before, so the day of the brunch, it was just a matter of reheating it, covered with tin foil – and you’re done!
Kitty
Gluten & Dairy Free Quiche
A Foodies’ Kitchen original recipe
Makes one 9×13-inch quiche, about 14-15 servings
Ingredients, for the crust:
326 g. gluten-free all-purpose flour
½ teaspoon salt
8-oz. unsalted butter, diced
1 teaspoon apple cider vinegar
⅓ to ½ cup cold water
Ingredients, for the filling:
1 medium yellow onion, chopped
1 garlic clove, minced
1 red bell pepper, diced
4 handfuls of fresh spinach, roughly chopped
1 pound of cherry tomatoes, cut in half
8 eggs
1 cup unsweetened almond milk
1 teaspoon baking powder
1 teaspoon salt
1 teaspoon paprika
½ teaspoon thyme
1 teaspoon dried oregano
1 teaspoon dried basil
½ teaspoon black pepper
olive oil, to sauté the vegetables
Preparation:
- For the crust, combine the flour and salt in the bowl of a food processor. Pulse a few times. Then, add the butter, and process until the mixture resembles small peas from 8 to 10 seconds.
- Keep pulsing and add the vinegar and ⅓ cup of ice water in a slow, steady stream through the feed tube. Pulse until the dough holds together without being wet or sticky. To test, squeeze a small amount together: If it is crumbly, add more ice water, 1 tablespoon at a time.
- Make a single disc, flattening it and wrapping it in plastic. Transfer to the refrigerator and chill for at least 1 hour. Dough may be stored, or frozen, for up to 1 month.
- When you’re ready to bake, take the dough disk out of the fridge for 15-20 minutes, until slightly softened. Roll it out on a lightly floured piece of parchment paper. As we’re working with a gluten-free dough, it’s usual that some of the edges crack as you roll it, so patch them as needed. Roll it to a ½-inch thickness.
- Preheat the oven to 400˚F. Transfer the dough to a 9 by 13-inch pie dish, and prick the bottom with a fork. Line the crust with a large piece of parchment paper then pour in dried beans or pie weights to completely cover the bottom.
- Bake 15 minutes. Remove the parchment and beans, and bake for an additional 5 minutes longer.
- For the filling, in a large skillet, heat olive oil and sauté onions until fragrant and translucent. Add the minced garlic clove and continue cooking for a minute or two. Add the chopped bell pepper, and sauté for 3 minutes. Add the spinach and cook until softened. Remove from the heat.
- Mix the eggs, almond milk, baking powder, and spices in a big bowl. Mix until everything is combined. Add half the egg mixture on into the pie dish, and top with the cooked vegetables and tomatoes. Add the rest of the egg mix.
- Lower the temperature to 350ºF. Bake 45-50 minutes, or until a toothpick inserted comes out clean. The quiche can rise while baking, but it will settle back down when cooling. Remove from the oven and let it sit for at least 5 minutes before serving.
Notes:
- If you plan to serve it the next day, warm it at 325ºF for 25 minutes.
Have you made this recipe?
Please let me know how it turned out for you! Leave a comment below and share a picture with the hashtag #thefoodieskitchen!
Want more?
You can subscribe to our newsletter and we’ll send you the monthly recipes! You can also keep up to date on Facebook, Twitter, Instagram, Pinterest or Tumblr.
© 2022, The Foodies’ Kitchen. All rights reserved | Todos los derechos reservados
This post is also available in / Esta entrada también está disponible en ESPAÑOL (SPANISH)


