Apple Pie
This post is also available in / Esta entrada también está disponible en ESPAÑOL (SPANISH)
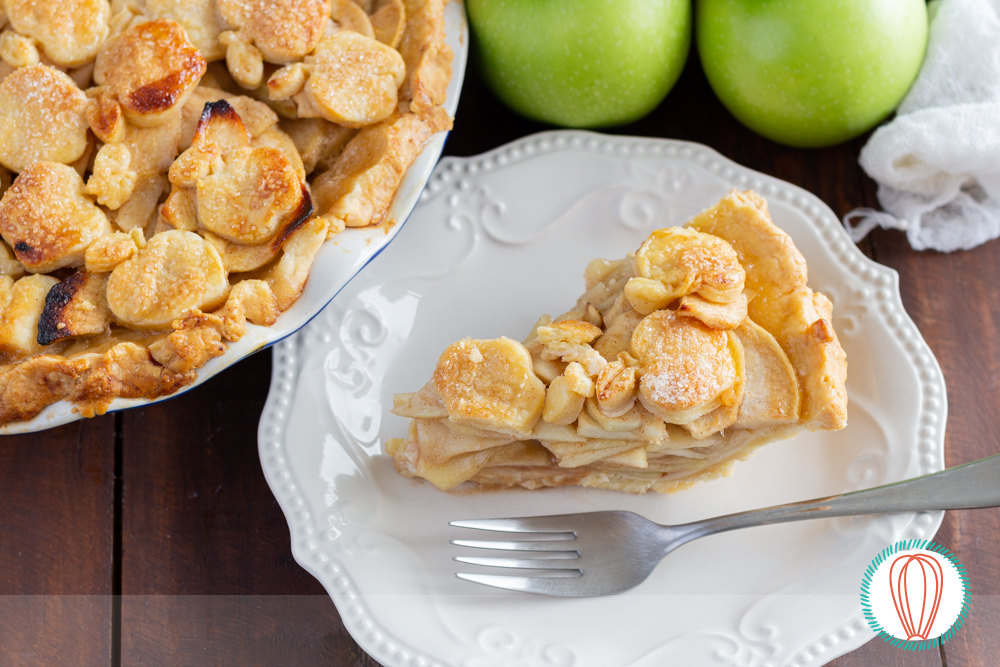
When we think of classic desserts, one of the first that comes to mind is apple pie. Warm or cold, with ice cream or whipped cream, the comforting scent of spices and baked apples reminds us of home-baked desserts.
There are a few tips that can help us make an apple pie delicious, and the most important is to choose the right type of apple to bake. Washington Granny Smith apples are perfect for any baked dessert, especially pies. Their tangy flavor complements sugar and spices and their texture makes them ideal for baking or cooking.
What we are looking for is that the filling has as much of our apple mix as possible, so we recommend cutting your apples thinly and placing them flat, with the curve facing the edge of the baking dish. This way, you will be able to get a good amount in and each bite will have maximum flavor.
Here we give you the recipe for a delicious homemade dough, but you can use prepared dough to speed up the preparation of the dessert.
To serve, we recommend a scoop of vanilla ice cream or whipped cream.
Helga & Kitty
Apple Pie
Receta original de The Foodies’ Kitchen
Rinde 8 porciones
Ingredients, for the pie dough:
2 ½ cups all-purpose flour
1 teaspoon salt
1 teaspoon sugar
1 cup unsalted butter, chilled and cut into small pieces
¼ to ½ cup ice water
Ingredients, for the pie filling:
About 3 lb. Washington Granny Smith apples (making a total of 6 cups of apples)
1 cup brown sugar
¼ teaspoon fine salt
2 teaspoons ground cinnamon
½ teaspoon allspice
⅓ cup fresh lemon juice
3 ½ tablespoons cornstarch, divided
3 tablespoons water
3 ½ tablespoons unsalted butter
egg wash: 1 egg + 2 tbs water
sanding sugar, for sprinkling
Prepare the dough:
- In the bowl of a food processor, combine flour, salt, and sugar. Add butter, and process until the mixture resembles coarse meal, 8 to 10 seconds.
- With machine running, add ice water in a slow, steady stream through feed tube. Pulse until dough holds together without being wet or sticky; be careful not to process more than 30 seconds. To test, squeeze a small amount together: If it is crumbly, add more ice water, 1 tablespoon at a time.
- Divide dough into two equal balls. Flatten each ball into a disc and wrap in plastic. Transfer to the refrigerator and chill at least 1 hour.
Prepare the filling:
- For the filling, peel and thinly slice the apples. Keep the slices in a bowl of lemon water as you go to prevent browning.
- In a large bowl, toss the apples with the brown sugar, salt, cinnamon, lemon juice, and half of the cornstarch. Once the apples are well coated, let sit and macerate for 30 minutes, stirring occasionally.
- Preheat the oven to 400˚F (200˚C).
- Transfer the apples to a colander set over a medium bowl and let drain for about 15 minutes, until all of the liquid is drawn out.
- Transfer the liquid released from the apples to a small pot over low heat.
- In a small bowl, mix the rest of the cornstarch and the water to make a slurry. Add the slurry to the apple liquid and quickly stir to incorporate it. Bring to a boil, then add the butter and stir until melted. Immediately remove from the heat and pour over the apples, stirring to coat.
- Gently lay 1 rolled-out pie crust in a 9-in. pie dish.
- Lay the apples in the pie crust, making sure they are flat and facing the rounded edges out in order to fit as many apples as possible in the crust. Pour any leftover liquid from the bowl over the apples.
- Top with the other rolled-out pie crust. Trim the excess dough from the edges. Cut out shapes from the pie dough using a cookie cutter to cover the top part of the pie. If covering with two crusts, press them together to seal, then fold the edges under. Crimp the edges.
- Brush all over with egg wash and sprinkle with sanding sugar.
- If you covered the pie with an entire crust, use a paring knife to cut a few vents in the top for steam to escape.
- Bake for 40-45 minutes, until golden brown.
- Let cool for at least an hour. Slice and serve.
Have you made this recipe?
Please let me know how it turned out for you! Leave a comment below and share a picture with the hashtag #thefoodieskitchen!
Want more?
You can subscribe to our newsletter and we’ll send you the monthly recipes! You can also keep up to date on Facebook, Twitter, Instagram, Pinterest or Tumblr.
© 2022, The Foodies’ Kitchen. All rights reserved | Todos los derechos reservados
This post is also available in / Esta entrada también está disponible en ESPAÑOL (SPANISH)


