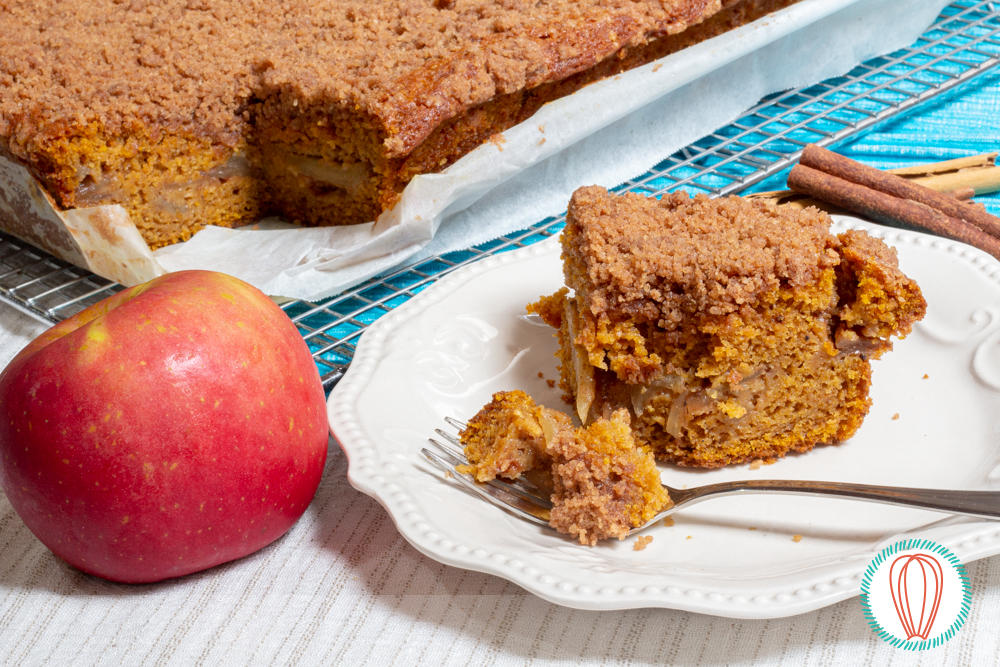
Apple & Pumpkin Crumble Coffee Cake
This post is also available in / Esta entrada también está disponible en ESPAÑOL (SPANISH)
Even though October has passed and November is already half-way through, this Apple & Pumpkin Crumble Coffee Cake is one of those easy to make desserts you can whip quickly to take for a friend’s gathering or a quick celebration at the office. Honestly, the thing that takes most of the time is peeling and slicing the 3 apples. I’m not talking about a dozen here… it’s three! So it goes by fast.
You need almost two sticks of butter for this. Part for the crumble, where you use melted butter, and part for the cake, where you use room temp butter. If you didn’t take it out the night before, worry not. The first thing you do is take out the butter from the fridge and cut it in small cubes. Yes, the first thing, before taking out the rest of the ingredients for a mise-en-place (meaning putting everything you need to make this recipe in place, measuring included), and before preheating your oven. By cutting the butter in small cubes, it will get to room temperature much quicker and it will cream with the sugar faster. We got you.
This recipe also calls for buttermilk. If you don’t have any around, you can whip some at home by using whole milk and a bit of vinegar. Here’s the link to our Homemade Buttermilk recipe for your convenience. See? We’re making this easy. And what I love about this recipe? It’s easy, makes enough for a Sunday gathering, and if you happen to need to take the cake with you, you can easily use one of these that already come with a lid on top for easy traveling.
Kitty
Apple & Pumpkin Crumble Coffee Cake
Recipe from The Candid Appetite
Yields one 9×13-inch cake
Ingredients, for the topping:
1 cup of sugar
1 cup all-purpose flour
¼ teaspoon salt
1 tablespoon cinnamon
6 tablespoons unsalted butter, melted and cooled
Ingredients, for the filling:
3 medium apples
⅓ cup packed light brown sugar
½ teaspoon cinnamon
¼ teaspoon nutmeg
¼ teaspoon ginger
⅛ teaspoon all-spice
⅛ teaspoon cloves
1 ½ tablespoons cornstarch
Ingredients, for the cake:
1 cup unsalted butter, softened
1 cup packed light brown sugar
½ cup of sugar
4 large eggs, room temperature
1 (15-oz.) can pumpkin purée
2 teaspoons vanilla extract
1 cup buttermilk
2 cups all-purpose flour
2 teaspoons baking powder
1 teaspoon baking soda
1 teaspoon salt
1 teaspoon cinnamon
½ teaspoon nutmeg
½ teaspoon ginger
¼ teaspoon allspice
¼ teaspoon cloves
Instructions:
- Grease a 9×13-inch baking pan, line with parchment paper, then grease and flour. Set aside.
- For the filling, prepare your apples: peel, core and thinly slice the apples. Then, toss with the sugar, spices, and cornstarch (ingredients under the filling list above) until they are evenly combined. Set aside.
- Preheat oven to 350°F.
- Now, for the topping go ahead and combine in a large bowl the sugar, flour, salt and cinnamon (ingredients under the topping list above). Mix in the melted butter until the mixture comes together, and set aside.
- And finally, for the cake whisk together the flour, baking powder, baking soda, salt and spices in a large bowl.
- In the bowl of a stand mixer, cream together both the sugars and butter until light and fluffy. Since we’re using brown sugar, the mix won’t be as pale as it usually gets.
- Mix in the eggs, one at the time, making sure to mix well after each addition. Then add the vanilla and pumpkin purée.
- Next, in three additions, add the dry ingredients, alternating with the buttermilk. Stir just until combined using a spatula, making sure not to over-mix.
- Add half the batter into the prepared pan, spreading it out into an even layer. Top with apples, making sure not to add the juices from the bottom of the bowl. Spread the rest of the cake batter, and sprinkle the topping in an even layer on top.
- Bake for 45-55 minutes, until the cake, is golden brown from the sides, and no longer jiggly in the middle. The best way to test if the cake is done is by inserting a cake tester or toothpick in the middle and it comes out clean.
- Take the cake out of the oven and allow the cake to cool completely before serving.
Have you made this recipe?
Please let me know how it turned out for you! Leave a comment below and share a picture with the hashtag #thefoodieskitchen!
Want more?
You can subscribe to our newsletter and we’ll send you the monthly recipes! You can also keep up to date on Facebook, Twitter, Instagram, Pinterest or Tumblr.
© 2019 – 2020, The Foodies’ Kitchen. All rights reserved | Todos los derechos reservados
This post is also available in / Esta entrada también está disponible en ESPAÑOL (SPANISH)


