Tutorial: Filling & Covering a Cake with Buttercream (Part 3 of 3)
This post is also available in / Esta entrada también está disponible en ESPAÑOL (SPANISH)
Following up on our first and second tutorial posts, in which we covered baking, leveling and layering a vanilla cake; and making Italian Meringue Buttercream, we finally move on to the last part: covering the cake with buttercream.
There are some inside tips we learned from watching expert bakers. Once you know these tips, you can cover your homemade cakes to look like you bought them at the bakery!
Helga
Part 1 | Part 2 | Part 3
Tools
A cake board (which we didn’t use, and it would have made moving the cake to its stand a lot easier). You can buy those at bakery stores, both a large and a small spatula, a scraper, and a turn table. The scraper is what you need to get a smooth finish.
Crumb Coat
This step is essential to get a neat cake. After you layer your cake, you apply a thin layer of buttercream all around it, and then refrigerate it from 30 minutes to 1 hour. This will make the butter in your buttercream set, making a sort of barrier and it will let you continue applying your room temperature buttercream all over the cake, without dragging crumbs all over.
Basic Cake Covering Technique
We could write all about how to use buttercream to cover your cake, but it’s better if you watch expert Yolanda Gampp from How to Cake It demonstrate. We learned how to do it, by watching her. She uses simple syrup to soak each cake layer, because she makes elaborate cakes that take days to complete, using fondant to cover them up. This simple syrup soak is not really necessary for the home baker. We skipped it.
Tip: Go a little heavy when covering the sides of your cake with buttercream. You will remove the excess with your scraper and it will be easier to get smooth sides.
Variation
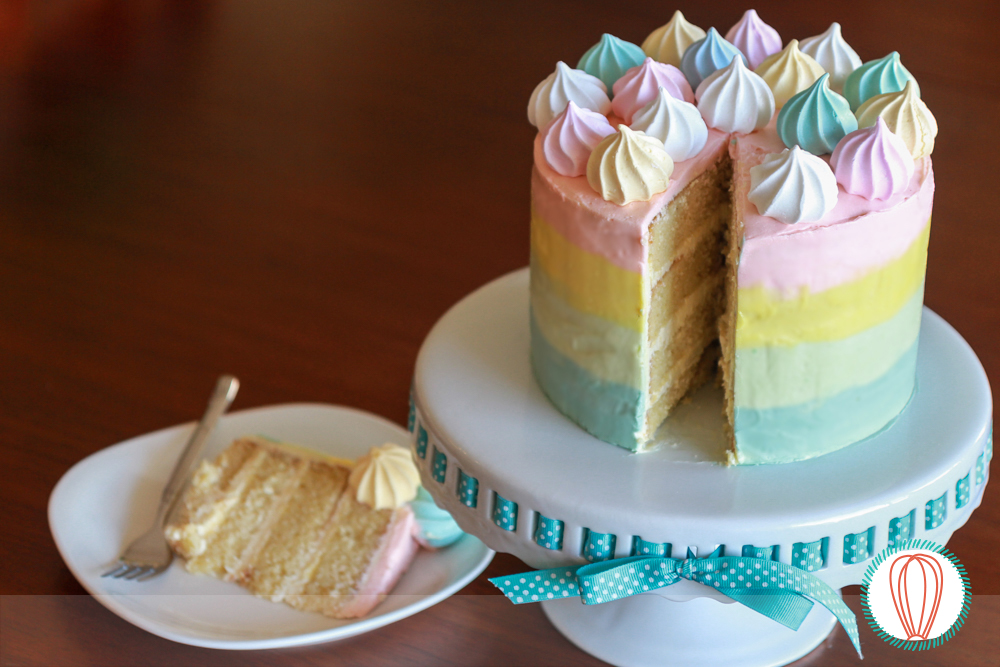
Now you know how to cover a cake with buttercream. For our cake we tried a different type of coverage,using colored stripes all around the cake, which we then smoothed out with our scraper, and topped with store-bought colored meringues.
You can see the how-to video from Cupcake Jemma here:
We hope you have fun trying these techniques at home! Happy baking!
Have you made this recipe?
Please let me know how it turned out for you! Leave a comment below and share a picture with the hashtag #thefoodieskitchen!
Want more?
You can subscribe to our newsletter and we’ll send you the monthly recipes! You can also keep up to date on Facebook, Twitter, Instagram, Pinterest o Tumblr.
© 2017 – 2020, The Foodies’ Kitchen. All rights reserved | Todos los derechos reservados
This post is also available in / Esta entrada también está disponible en ESPAÑOL (SPANISH)


