Little Foodies: Witch’s Brew Cupcakes
This post is also available in / Esta entrada también está disponible en ESPAÑOL (SPANISH)
We decided to try a new chocolate cupcake recipe (even though we already have several on our blog) mainly because we are fans of this particular baker. We have been watching Cupcake Jemma’s videos for a while, and we were curious to try her version of a quick buttercream, which is also known as American Buttercream.
We usually make Italian or Swiss buttercream, which is delicious and smooth, but takes longer to make, and they have their technique. This buttercream recipe is ideal if you are in a hurry and if you are cooking with kids. There are just a few tips you need to follow to get a smooth and fluffy icing:
- Make sure you sift your icing sugar, that you add it in batches, about 1 cup at a time.
- Cream the butter and sugar long enough
- Make sure the ingredients are at room temperature.
- If you find the buttercream is too stiff, you can add up to 4 tablespoons of milk.
As far as the cupcake recipe goes, I recently got a digital scale to weigh ingredients for baking, so I used the amounts detailed in the recipe exactly as they are listed. Baking is so exact, that I think it is worth investing in an inexpensive digital scale and liquid measuring cup and use the measurements if they are given to you in grams and millilitres.
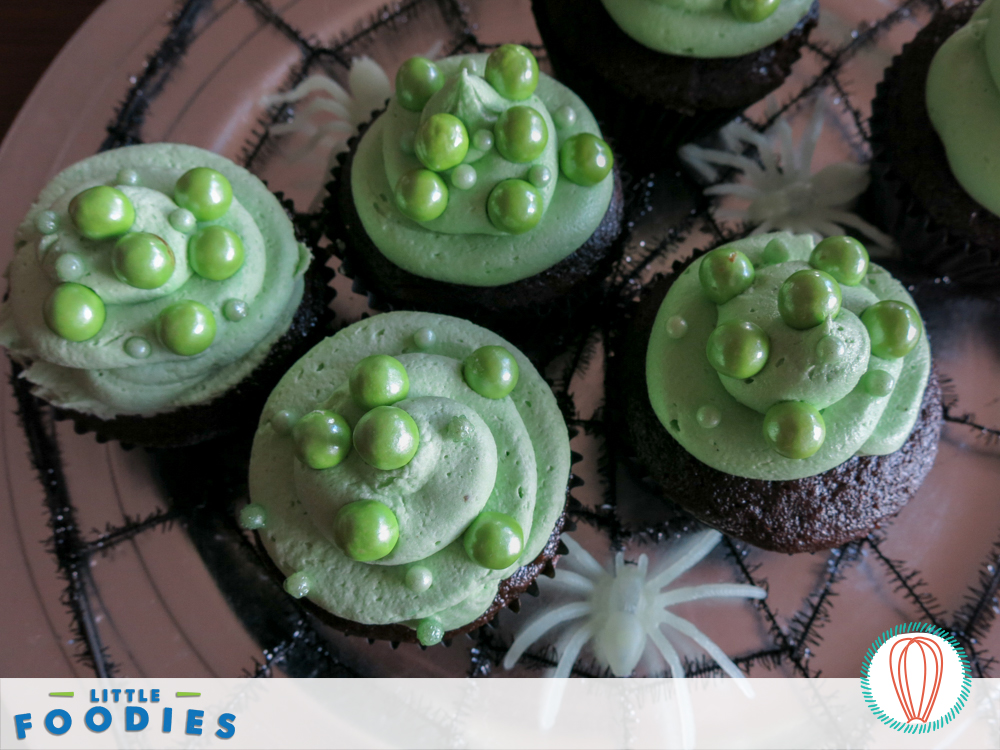
These cupcakes came out fluffy, moist and we really enjoyed the chocolate bits in the center. To make them look like witch’s brew you need to color your icing a bright green color, and use green candies in the same shade of green. We found the little green pearls at a local bakery store. Let us know if you try the recipe!
Helga
Witch’s Brew Cupcakes
Recipe adapted from Cupcake Jemma
Makes 24 cupcakes
Ingredients, for the cupcakes:
350 grams all-purpose flour
370 grams sugar
60 grams cocoa powder
1 teaspoon baking soda
½ teaspoon salt
150 grams chocolate chips
1 cup room temperature coffee
1 cup whole milk or buttermilk
225ml vegetable oil
3 large eggs
cupcake liners, we used black
Ingredients, for the buttercream:
200 grams of unsalted butter, at room temperature
450 grams of confectioner’s sugar, sifted
2 tablespoons of whole milk
½ teaspoon of vanilla extract
green gel coloring
green candies and sprinkles
Preparation:
- Preheat oven at 320ºF (160ºC). Prepare the tins with cupcake liners.
- If you’re using instant coffee, add 1 tablespoon of instant coffee to 1 cup of hot water. Mix and let it cool.
- In a large mixing bowl, sift together the flour, sugar, cocoa, baking soda and salt.
- Add the chocolate chips to the dry ingredients, and mix with a whisk to incorporate everything well.
- In another bowl, mix a cup of room temperature coffee, oil, milk and eggs. Using your whisk mix it all together.
- Add the dry ingredients to the wet ingredients, and stir it all together until it is well incorporated.
- The batter will be thin. Transfer it into a measuring cup (or a jar with a spout), and use it to fill your cupcake tins.
- Carefully, fill to about ⅔ of the way. Use a spoon to catch the drips as you go along.
- Bake the cupcakes for 24 minutes, and cool completely before frosting.
- For the buttercream, beat butter for about 2 to 3 minutes, until it is pale, light and fluffy.
- Add 1 cup of the sifted confectioner’s sugar to the butter. Mix on low-speed and increase the speed gradually, just until it is incorporated.
- Add another cup of icing sugar and repeat, start slow and then increase the speed. Continue until you have added all your sugar and mix for about 2 to 3 minutes.
- Add the milk and continue mixing slowly, and increase the speed again. Mix for another 2-3 minutes.
- Add the vanilla extract, and mix for 1 to 2 minutes.
- Add the green gel coloring, small bits at a time until you reach the desired color. This type of coloring is very strong, so use a toothpick to gradually add it in.
- Transfer the buttercream to a piping bag and decorate the cupcakes in a circular motion. Top with the green candies, green pearls or sprinkles.
To download a printable version of this recipe, click below!
Download Printable
Have you made this recipe?
Please let me know how it turned out for you! Leave a comment below and share a picture with the hashtag #thefoodieskitchen!
Want more?
You can subscribe to our newsletter and we’ll send you the monthly recipes! You can also keep up to date on Facebook, Twitter, Instagram, Pinterest, Tumblr or Snapchat.
© 2016 – 2020, The Foodies’ Kitchen. All rights reserved | Todos los derechos reservados
This post is also available in / Esta entrada también está disponible en ESPAÑOL (SPANISH)


