Gluten Free Flourless Chocolate Cake
This post is also available in / Esta entrada también está disponible en ESPAÑOL (SPANISH)
Hello all! Hope this weekend was the perfect ending for the holiday vacations and that you are all getting back into the usual routines. I’ve used this past few days to get back into work, but more specifically into planning. We want 2015 to be a great year, with more posts of delicious meals, desserts and great ideas. Do you have a resolution for this New Year? Save up for a family vacation? Maybe a huge eating habit switch? We try to serve everybody here, and this is a perfect dessert for those who are gluten intolerant or want to lay off flours.
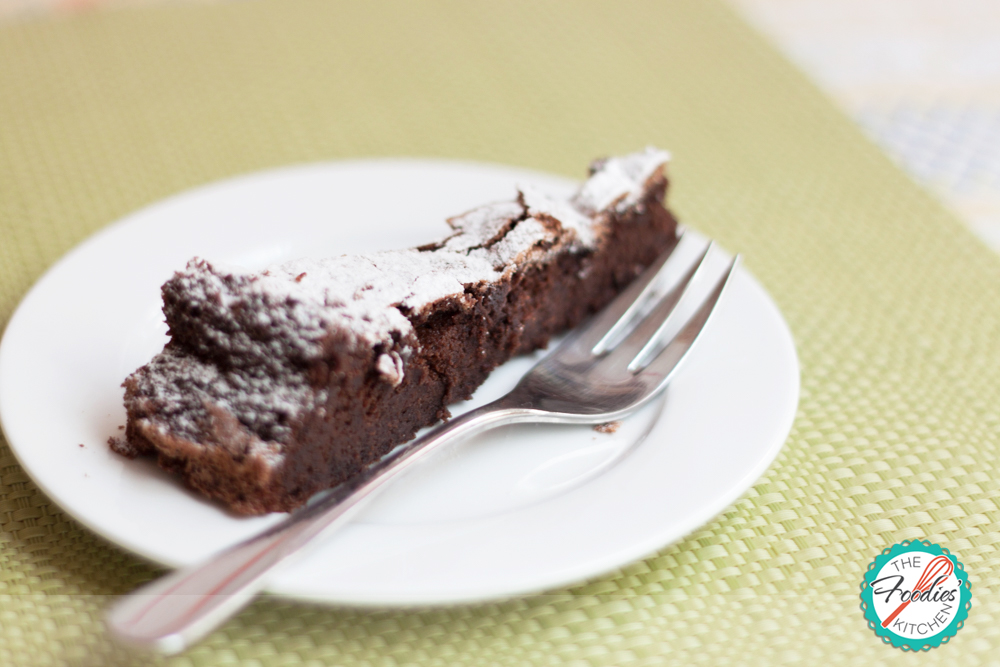
This Gluten Free Flourless Chocolate Cake was what I bought as dessert for New Year’s dinner. It was a small family gathering, and as one of my cousins can’t have any gluten on her diet, so I wanted to bring something that she could enjoy. Searched high and low for the recipe, and found this recipe from the Martha Stewart kitchens. And here are a few things I learned while making this cake:
- Properly whip your egg whites: Since this recipe has no added flour or leavenings, it is critical that you whip the egg whites until you get glossy peaks, like meringue. The egg whites will be what makes your cake grow tall (while it bakes).
- Parchment Paper is your friend: Line up the bottom of a spring-form pan with parchment paper. That is, place a large piece of parchment paper over the bottom of the pan, and then close the ring. This will cover completely the bottom of the pan, and trust me, you will love us for the tip. Much easier to clean up! After that, you can butter the pan (the bottom and all the way to the top).
- Sinks while it cools: Sinks rapidly. Don’t worry, as it’s supposed to do that. It looks cracked and all… but you cover it with confectioner’s sugar and all is good again. You can serve it a-la-mode with vanilla ice cream or with a spoonful of sweetened whipping cream.
The cake keeps for a few days at room temperature just fine. I just cut up the parchment paper excess from the bottom of the tin and placed the cake (still on the base of the tin) over a nicer plate. This cake is fragile, so I wouldn’t recommend taking the cake off the base of the pan. Also, this cake has so much chocolate goodness in it, that a small slice goes a long way. The recipe says that it can serve 8, but I can confidently say that it serves between 8 to 10 servings if not more.
I hope you enjoy this cake as much as we did back on New Year’s dinner and may all your 2015 resolutions and dreams come true!
Kitty
Gluten Free Flourless Chocolate Cake
Recipe by Martha Stewart
Makes one 9-inch cake
Yields 8-10 portions
Ingredients:
6 tablespoons unsalted butter, plus more for pan
8 ounces semi-sweet chocolate, finely chopped
6 large eggs, separated
½ cup granulated sugar
Confectioners’ sugar, for dusting
Preparation:
- Pre-heat the oven to 275°F with the rack in the center.
- Place a sheet of parchment paper on the bottom of a 9-inch spring-form pan, and close it (so the paper is kept in place by the ring of the pan). Butter the sides and bottom of the pan and set aside.
- Melt the butter and chocolate in a heat-proof bowl, over a double boiler taking care that the water boiling is not touching the bow. Stir them both until completely melted. Set aside to cool a bit.
- Separate the 6 large eggs, placing the egg yolks in separate dish and the egg whites in the bowl of your stand-in mixer. Beat until soft peaks form and gradually add the granulated sugar. Continue beating until glossy peaks form.
- Add the 6 egg yolks to the warm chocolate and combine.
- Whisk ¼ of the whipped egg whites into the chocolate to lighten up the mix.
- Gently fold the egg whites into the chocolate mixture.
- Pour batter into the prepared pan, and bake until the cake pulls away from the sides of the pan and is set in the center, 45 to 50 minutes. You’ll know it’s done when the cake is no longer jiggly in the middle, you can insert a wooden skewer in the middle, and if it comes out with little to no crumbs, it’s baked through!
- Cool completely on a wire rack. As it cools, the cake will sink considerably, see the pictures bellow. After it has cooled completely, run the back of a knife on the sides of the pan and remove the spring-form’s pan ring.
- Dust with confectioner’s sugar and serve at room temperature.
Have you made this recipe?
Please let me know how it turned out for you! Leave a comment below and share a picture with the hashtag #thefoodieskitchen!
Want more?
You can subscribe to our newsletter and we’ll send you the monthly recipes! You can also keep up to date on Facebook, Twitter, Instagram, Pinterest or Tumblr.
© 2015 – 2022, The Foodies’ Kitchen. All rights reserved | Todos los derechos reservados
This post is also available in / Esta entrada también está disponible en ESPAÑOL (SPANISH)


