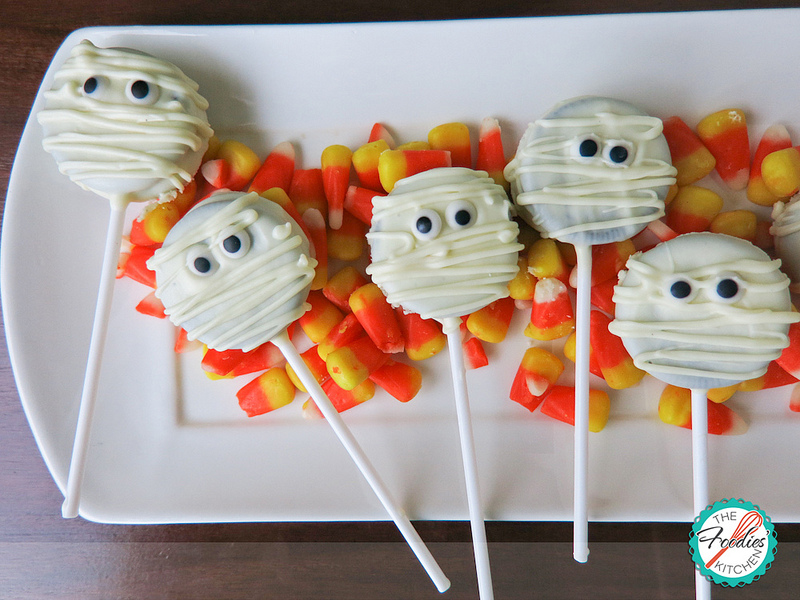
Mummy Pops
This post is also available in / Esta entrada también está disponible en ESPAÑOL (SPANISH)
As I mentioned in a previous post, this year I wanted to try practical, fun and also kid-oriented Halloween recipes that are not only easy to make but a treat they would really enjoy… and possibly help you make. All you need to make these mummy pops are Oreos, pop sticks, white chocolate for melting and candy eyes. I would suggest that you go to a specialty store to get your white chocolate and ask for one that is appropriate for melting. I made the first attempt with Hershey’s white chocolate chips… it was bad. Really bad. It didn’t melt, the whole thing started to harden and I ended up with a clump of grainy white chocolate. I had to throw it away. I was not happy. It seems that you can melt these chips, but you have to add a little shortening to the mix.
I decided I didn’t want to risk throwing another bag of white chocolate away, so I went to my local baking and confectionery supply store (Blossom), and I got white chocolate melting buttons to which they suggested I buy a “diluter” which comes in a little bag and has a white flaky appearance. This time, my chocolate melted beautifully. I didn’t really need the diluter, but I already had it, so I gave it a sprinkle. (They told me to melt the chocolate and add it as you would add salt to a dish. Little pinches of it until you get the consistency you need).
To cover the cookie pops once you have inserted the stick, simply dip them, spoon chocolate over them, and then rest the covered pop on a spoon or fork over the bowl to let all the excess drip off. This is how I got a smooth finish on mine. To make the little lines, just use a sandwich plastic bag and cut the tiniest hole you can to go back and forth over the cookie. Let them set, and you’re done. (Speed up the setting time by putting them in the refrigerator). You can also make these without the sticks, simply dipping the cookies into the white chocolate using the same method, and letting them set.
Have fun!
Helga
Mummy Pops
Recipe adapted from Makoodle
Ingredients:
1 lb white chocolate chips (appropriate for melting)
Lollipop sticks
Candy eyes
Oreo cookies (15-20 cookies)
Procedure:
- Melt the white chocolate in a double boiler set over simmering water. (Don’t melt it directly over the stove, it can ruin your chocolate) Add the diluter, if needed. (read what happened to me).
- Separate each Oreo cookie.
- Dip a lollipop stick’s tip into the melted chocolate, and place on one of the cookie’s halves. Put the top back on, and lightly press. Let them sit for about 10 minutes. (you can pop them in the fridge to speed this up). At this point, remove the chocolate from the double boiler so it isn’t too hot when you begin to use it.
- Dip the cookies into the melted chocolate, and with the help of a spoon, spoon chocolate to get the whole cookie covered. Lay the covered cookie on top of the spoon or a fork over the pot to let the excess drip off.
- Place on a cookie sheet and put the candy eyes on them before the chocolate sets.
- Spoon some of the chocolate in a plastic sandwich bag, and cut a very small hole on one of the corners.
- Gently squeeze the chocolate out of the bag in a back and forth horizontal motion over the cookies, avoiding the area where the little eyes are.
- Let them set, and if you’re pressed for time, you can put them in the refrigerator for about 10 minutes.
Note:
- Take a look at more images of this procedure from the blog that inspired me to make these Oreo Pops.
Have you made this recipe?
Please let me know how it turned out for you! Leave a comment below and share a picture with the hashtag #thefoodieskitchen!
Want more?
You can subscribe to our newsletter and we’ll send you the monthly recipes! You can also keep up to date on Facebook, Twitter, Instagram, Pinterest or Tumblr.
PIC
© 2013 – 2020, The Foodies’ Kitchen. All rights reserved | Todos los derechos reservados
This post is also available in / Esta entrada también está disponible en ESPAÑOL (SPANISH)


