Pumpkin Bread with Chocolate Chips
This post is also available in / Esta entrada también está disponible en ESPAÑOL (SPANISH)
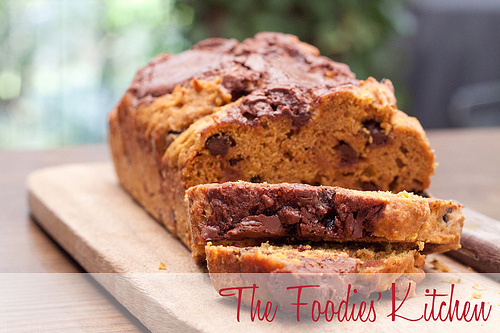
This is definitely one of the great things we love about fall. Pumpkins! When I saw this recipe on FOODILY by Candice Kumai (also known as the Stilleto Chef), I knew that I had to make it. Usually, when making a Pumpkin Bread, you get a dry and heavy loaf, so the secret to get a nice and fluffy bread is not to overmix the dough.
After reading the recipe, I decided that I would only use the mixer to cream the butter, then do the rest of the recipe by hand using a spatula – that way you are sure that you wont over mix it. Added the eggs, one at the time and mixing, ending with the pumpkin puree. Then, carefully add the dry ingredients and the chocolate chips. That’s it! By adding a bit of Nutella on top, you get a nutty and chocolate flavor that will leave you craving for more.
Kitty
Pumpkin Bread with Chocolate Chips
Recipe adapted from Candice Kumai
Makes: 2 small loafs
Ingredients:
1¾ cups of pumpkin puree, a 15-oz. can
⅓ cup of unsalted butter, melted
½ cup of light brown sugar
½ cup of dark brown sugar
3 eggs
3 cups of all-purpose flour
1 teaspoon of baking soda
1 teaspoon of ground cinnamon
1 teaspoon of powdered ginger
1 tablespoon of nutmeg powder
½ cup of chocolate chips
2 to 4 tablespoons of hazelnut spread
Directions:
- Grease two 8½” x 4½” x 2″ loaf tins with butter and coat them with flour with a bit of cinnamon. Preheat your oven at 350°C.
- Sift the dry ingredients: flour, baking soda, cinnamon, ginger and nutmeg. Set aside.
- With a hand mixer, cream the butter and sugars, until light and fluffy.
- Now, mixing with a spatula, add the eggs one by one and the puree mixing until combined.
- With gentle folding movements, incorporate the sifted mix it into the butter mix using deep strokes, as well as the chocolate chips. Do not over mix.
- Transfer the mix to the prepared pans, and add the hazelnut spread on top.
- Bake in the middle rack for 45 minutes, or until the cake is golden on top and the bread is firm to the touch. The hazelnut spread will look bright and runny. After it cools down it will thicken.
- Remove from the oven and let it cool completely before serving.
Have you made this recipe?
Please let me know how it turned out for you! Leave a comment below and share a picture with the hashtag #thefoodieskitchen!
Want more?
You can subscribe to our newsletter and we’ll send you the monthly recipes! You can also keep up to date on Facebook, Twitter, Instagram, Pinterest or Tumblr.
© 2012 – 2020, The Foodies’ Kitchen. All rights reserved | Todos los derechos reservados
This post is also available in / Esta entrada también está disponible en ESPAÑOL (SPANISH)


