Spellbinding Cookies
This post is also available in / Esta entrada también está disponible en ESPAÑOL (SPANISH)
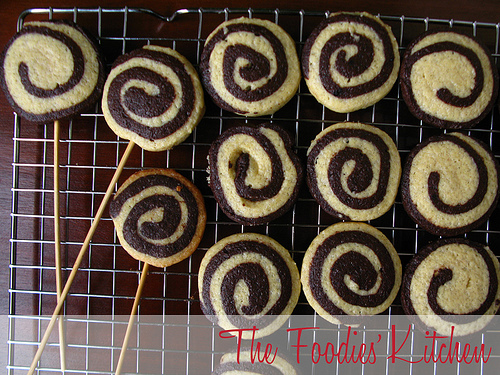
I was browsing through magazines, food sites, blogs and anything else that could get me new recipes and ideas to prepare goodies for this Halloween. I wanted something Beetlejuice or Harry Potterish, and then I found this recipe that more than its ingredients, it got me through its visual effect. Black and white Spellbinding cookies… Perfect!
I called my Sous Chef, Kristen (she’ll be 3 next month!) and we started to prepare the vanilla and chocolate doughs, that’s her rolling away in one of the photographs. I should have cleaned up the kitchen a little bit, but… cooking with a toddler is a messy business.
After preparing the dough, you will get 2 vanilla rectangles and 2 chocolate rectangles. The idea is to top one of the vanilla rectangles with one of the chocolate rectangles. Snip off the excess to get a neat rectangle and then roll it tightly. You will get two rolls. You can roll one with chocolate on top, and the other with vanilla on top, as you can see from my photos, you get two different looks. The original recipe says to roll from the short end, but I rolled mine from the long end to get a long log about 2 inches thick.
You can make these in advance, so when the baking time comes you can just cut out the prepared rolls, that’s how I did it.
Helga
Spellbinding Cookies
Recipe from Bake it Pretty
Yields about 40 cookies
Ingredients, for the vanilla dough:
2 sticks (1 cup) unsalted butter, softened
⅔ cup of sugar
1 egg
2 ⅓ cup of all-purpose flour
¼ teaspoon baking powder
1 ½ teaspoon vanilla
⅛ teaspoon salt
wax paper
Ingredients, for the chocolate dough:
2 sticks (1 cup) unsalted butter, softened
⅔ cup of sugar
1 egg
2 cup of all-purpose flour
⅔ cups of unsweetened cocoa powder
¼ teaspoon baking powder
1 ½ teaspoon vanilla
⅛ teaspoon salt
wax paper
Procedure:
- For the vanilla cookies, Beat butter and sugar until fluffy.
- Add egg and mix well. Stir in remaining ingredients until fully combined to make a stiff dough.
- Split the batch into two pieces, wrap each half in plastic wrap and refrigerate for about 1 hour.
- Place chilled dough between two pieces of waxed paper and roll into a rectangle roughly 7″ x 9″ and ¼” thick. Do this with both halves of dough. Then repeat the process with the chocolate cookie dough ingredients. You should have two sugar cookie rectangles and two chocolate rectangles. Chill rectangles briefly in the fridge.
- For assembly, remove the top layer of wax paper from dough rectangles, invert one chocolate dough on top of the vanilla sugar dough, lining up the edges of the rectangles.
- Gently roll over the top to make sure the layers stick together. Remove the top layer of waxed paper.
- Starting at a long end, use the wax paper to lift the sugar dough and roll both layers tightly into a log. Be sure to press gently as you go to ensure there are no gaps between the layers.
- Roll the finished log lightly on the counter to make it round and even. Repeat with the other two rectangles of dough. Wrap the finished logs and refrigerate for about 2 hours.
- When you are ready to bake, preheat oven at 350ºF. Remove dough logs from the fridge and use a knife to cut cookies about ¼” thick.
- Place cookies 1-inch apart from each other on a baking sheet lined with parchment paper (or silicone mats).
- If making lollipops, hold the cookie down with one hand and gently press a candy stick into the middle, about 1-inch into the cookie. Bake for about 10-12 minutes until just done. Do not let the edges brown. Transfer cookies to a wire rack to cool.
Note:
- It took me about 16-18 minutes to bake the cookies, I probably cut them too thick! Try to cut them at ¼” thick, as the recipe requires.
Have you made this recipe?
Please let me know how it turned out for you! Leave a comment below and share a picture with the hashtag #thefoodieskitchen!
Want more?
You can subscribe to our newsletter and we’ll send you the monthly recipes! You can also keep up to date on Facebook, Twitter, Instagram, Pinterest or Tumblr.
© 2011 – 2020, The Foodies’ Kitchen. All rights reserved | Todos los derechos reservados
This post is also available in / Esta entrada también está disponible en ESPAÑOL (SPANISH)


