Marshmallow Treat Pops
This post is also available in / Esta entrada también está disponible en ESPAÑOL (SPANISH)
Marshmallow treats… doesn’t it take you back to when you were a kid? I think this was one of the first things I ever made all by myself, I must have been about 8 years old. I remember I didn’t push them into a pan, but instead made them look like fat, deformed cookies. But I loved them… my family was probably just humoring me, but they ate them all!
I hadn’t even thought about making these until a few months ago, I’ve only made them a couple of times because I don’t want to overindulge Kristen’s sweet tooth, but… she’s still a kid, so I make these for her from time to time. (It’s a handy little lunch box snack, too).
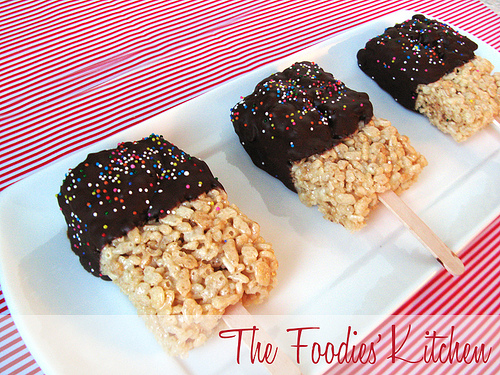
Marshmallow treats are great just as they are, cut into squares. However, this variation is fit for a celebration, or for any time you will have a group of kids in your home. They are toddler friendly too, I gave one to Kristen and she had no trouble eating it.
The easiest way to cover your treats with chocolate, is to transfer the melted chocolate into a glass. It is easier to cover the area this way.
Helga
Marshmallow Treat Pops
Recipe from Ricekrispies.com
Yields: About 12-18 pops
Ingredients:
3 tablespoons butter
40 regular marshmallows, about 1 10-oz. package
6 cups puffed rice cereal
8-oz. semi-sweet chocolate
18 pop sticks
sprinkles
Procedure:
- In large saucepan melt butter over low heat. Add marshmallows and stir until completely melted. Remove from heat. Add cereal. Stir until well coated.
- Using buttered spatula or wax paper, evenly press mixture into 13x9x2-inch pan coated with cooking spray. Cool. Cut into eighteen 3×2-inch bars. Push one stick into the bottom of each bar.
- Melt chocolate in a double boiler, stirring from time to time until it has completely melted. Transfer melted chocolate to a glass and dip bars into chocolate and decorate as you like. Place on wax paper lined baking sheet. Refrigerate until chocolate is set. Best if served the same day.
Variation: Instead of making pops, you can:
- Cut your treats into squares and drizzle chocolate on top.
- Spread chocolate evenly on top of your prepared treats, and after it has set cut into small squares
- In step 2: Instead of pressing the mixture into a pan, spread and press it evenly on a cookie sheet. You can use metal cookie cutters to cut off shapes… and you can eat the remains ;)
© 2011 – 2020, The Foodies’ Kitchen. All rights reserved | Todos los derechos reservados
This post is also available in / Esta entrada también está disponible en ESPAÑOL (SPANISH)


Comments (3)
Jill
April 28, 2012 at 6:15 am
Ps. I’m also making cake pops for the Cancer Relay for Life & last year sent them the day before the event with no problem. They tasted very fresh. I did bake & freeze the undecorated cake pops beforehand then took the out the day before & dictated & shipped overnight that same day. Do you think
They’d turn out ok if I FROZE THEM DECORATED, dipped them in my famous delicious chocolate coating, wrapped them tightly in individual plastic sucker bags & took straight from freezer & shipped PRIORITY
FED EX FOR NEXT DAY DELIVERY? That they would still be fresh? Taken directly from freezer that’ way? Or should unstick with just baking CakePops, freezing them & decorating
Them the day of shipment? Or
Should I just wait until the morning of my shipping & decorate with chocolate that day & send directly
That day after decorating? I’ve never shipped the that way before & don’t want to comprise the delicious taste of the chocolate covered cake pops! PLEASE ADVISE ASAP!
Thanks SO SO much for any and all helpful hints
:)
Sincerely,
Jill
Kitty
April 28, 2012 at 8:57 am
Hi Jill! My concern would be the temp change when shipping and the chocolate melting, but overall they should be ok…
~ Kitty