Rhubarb Upside-Down Cake
This post is also available in / Esta entrada también está disponible en ESPAÑOL (SPANISH)
Spring has been on the colder side in Upstate NY this year and until this past weekend I really started to feel like we have warmer weather. A few days ago I found Rhubarb, I couldn’t help myself so I chose the best (and pink) stalks and had them waiting here patiently for the perfect recipe. Jake’s mom sent me a link to the Rhubarb Upside-Down Cake… Perfect!
My adventure began… I had everything ready, even placed the little butter squares in the pie dish when GASP! I noticed that the rhubarb was pretty much filling the entire dish and the batter nor the crumble was in it! Sigh, quick change of dish. As quickly as I could, I grabbed my spring form pan, greased it, cut wax paper to make it exactly as the bottom (because of the sugar and rhubarb mix), placed it in the bottom and greased it again. I tell you, I don’t think it took me more than a couple of minutes. This because the sugar and the rhubarb juices were starting to mix! Ok, after all that crazy change pans thing happen I’ll tell you why I added the wax paper on the bottom and double greased it. Since this cake has plenty of sugar and fruit on the bottom, it tends to stick. The wax paper makes it easier to remove the cake from the pan.
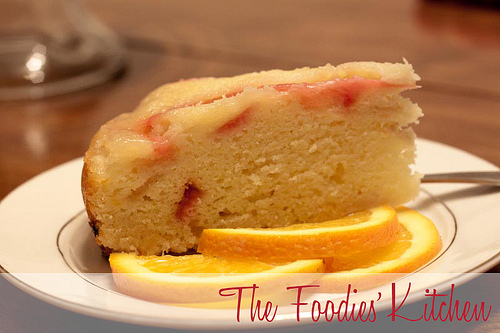
The cake came out beautifully and perfect. It’s not too sweet and perfectly moist. Next time I might cut the rhubarb in smaller pieces instead of the long stalks. All around, it’s a perfect batter and I’ll definitely try it with pineapple for another version of this cake.
Kitty
Rhubarb Upside-Down Cake
From Martha Stewart
Yield: Makes one 9-inch cake
Serves 10
Ingredients, for the Topping
4 tablespoons unsalted butter, melted
½ cup all-purpose flour
¼ cup sugar
¼ teaspoon salt
Ingredients, for the Cake
1 ½ sticks unsalted butter, room temperature
1 pound rhubarb, trimmed and cut on a very sharp diagonal (½ inch thick)
1 ¾ cups sugar
1 ½ cups all-purpose flour
¼ teaspoon baking powder
¼ teaspoon salt
½ teaspoon finely grated orange zest
1 tablespoon fresh orange juice
2 large eggs
1 cup sour cream
Directions:
- Preheat oven to 350 degrees.
- First prepare your topping, stir together butter, flour, sugar, and ¼ teaspoon salt until moist and crumbly.
- Butter and flour a 9-inch round cake pan (2-inches deep) – very important. See my notes bellow.
- Dot with 4 tablespoons (½ stick) butter cut into pieces.
- Toss rhubarb with ¾ cup sugar; let stand for 2 minutes. Toss again, and spread in pan.
- Whisk together flour, baking powder, and salt.
- Beat remaining stick butter and cup sugar with a mixer on medium speed until pale and fluffy.
- Beat in zest and juice.
- Beat in eggs, 1 at a time, until incorporated, scraping down sides of bowl.
- Beat in flour mixture in 3 additions, alternating with sour cream, until smooth.
- Spread evenly over rhubarb.
- Crumble topping evenly over batter.
- Bake until a toothpick inserted into the center comes out clean and top springs back when touched, about 1 hour. Let cool for 10 minutes (use your kitchen timer).
- Run a knife around edge of cake, and invert onto a dish. Let cool completely.
Notes:
- The pan you use has to be at least 2-inches high. I used a bit more rhubarb than the recipe calls for and when I placed my rhubarb on the bottom of the glass pie dish, it soon became half full. This without the batter. So trust me on this one, use a pan at least 2 inches tall.
- If you are using a spring form pan, make sure to place it in a cookie baking sheet, so if it drips juices, it’s caught by the baking sheet and not your oven!
- Let the cake cool for 10 minutes before removing it from the pan. The rhubarb will be too hot to handle safely right after baking. But if the cake sits much longer, it may stick.
- After removing the cake from the pan, make sure to place it upside-down and remove the wax paper (now on the top).
Have you made this recipe?
Please let me know how it turned out for you! Leave a comment below and share a picture with the hashtag #thefoodieskitchen!
Want more?
You can subscribe to our newsletter and we’ll send you the monthly recipes! You can also keep up to date on Facebook, Twitter, Instagram, Pinterest or Tumblr.
© 2011 – 2020, The Foodies’ Kitchen. All rights reserved | Todos los derechos reservados
This post is also available in / Esta entrada también está disponible en ESPAÑOL (SPANISH)


Comments (1)
Cranberry, Strawberry & Rhubarb Sauce – The Foodies' Kitchen
December 15, 2024 at 3:02 pm
[…] In a culinary context, rhubarb refers to the plant’s stalks. We have plenty of recipes: like this upside-down cake, cupcakes, jam, and pie. Usually we find Rhubarb in the summer, but to my surprise I found some at […]