Easter Egg Dyeing
This post is also available in / Esta entrada también está disponible en ESPAÑOL (SPANISH)
Easter is around the corner, so we are sharing this instructional post for those of you who want to try dyeing eggs this year as part of an Easter hunt activity for your kids.
This has been a tradition in my family for decades. We used to get together at my Oma’s house on Sunday morning for the much anticipated Easter hunt. She had a beautiful and quite large garden, so finding the eggs and treats was very entertaining.
This was such a special and memorable part of my childhood, that I want to keep the tradition going so my daughter, nephews and future children in our family can enjoy it as well.
We will be posting a few Easter recipes, that include Chocolate Filled Eggs!
Helga
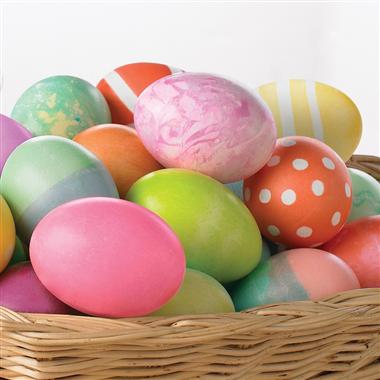
Easter Eggs picture from Reluctant Entertainer
Coloring Easter Eggs
There’s no need to buy special kits for dyeing Easter eggs—all the ingredients you need are probably already in your cupboards. This recipe uses liquid food coloring, but you can also use paste. Experiment with combining different colors to produce new shades—for instance, 17 drops of yellow and 3 of red will produce a brilliant orange.
Ingredients
Recipe from Epicurious
For each color:
1 teaspoon white vinegar
About 20 drops liquid food coloring
White-shelled hard-boiled eggs
Preparation (To make 1 color)
- Line large baking sheet with paper towels and top with wire cooling rack.
- In small bowl or cup, stir together 1/2 cup boiling water, vinegar, and food coloring.
- Immerse eggs in dye, turning occasionally to ensure even coating, until desired color, about 5 minutes.
- Using slotted spoon or tongs, remove eggs from dye and transfer to rack to drain. Refrigerate when dry.
Here are some ways to create designs on your eggs:
- Wrap a portion of the egg with a rubber band before dyeing. Once the egg is dry, remove the rubber band to reveal the white, undyed strip underneath.
- Another way to block off portions of the egg: Affix stickers or tape in shapes such as daisies or dots before dyeing. Remove once the egg is dry.
- A third way to block off portions: Before dyeing, draw on the egg with a light-colored crayon or wax. If desired, once the egg is dry, the wax can be softened by holding the egg over a candle flame and then wiped off.
- All three of these methods can also be used to create two-toned eggs: Dye the whole egg a light color, such as pink, and let it dry. Then wrap the egg with a rubber band, affix stickers, or draw a design in crayon. Dye the egg a second color, such as blue. Once dry, remove the rubber band, stickers, or crayon. The areas blocked off will remain the first color (in this case, pink), while the rest of the egg will turn a combination of the 2 colors (in this case, purple).
- Dip a portion of the egg in one color and another portion in another color. If the two sections overlap, that area will turn a combination of the two colors.
© 2011 – 2020, The Foodies’ Kitchen. All rights reserved | Todos los derechos reservados
This post is also available in / Esta entrada también está disponible en ESPAÑOL (SPANISH)


