Chocolate Flan Cake: The Impossible Cake
This post is also available in / Esta entrada también está disponible en ESPAÑOL (SPANISH)
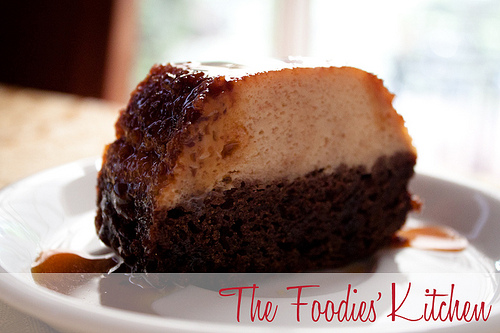
I have family in Mexico, and my cousin Rosana (who happens to have a dance studio in Mexico called Danzarines, shameless plug) makes The Chocolate Flan cake: an Impossible Cake. Why impossible you ask? You pour the caramel, then the chocolate cake batter and the flan on top, then get it in the oven and when you take it out… You have Cake on top! My grandma Flory (aka pie extraordinaire) absolutely loves this cake, and she always asks Rosana to make it for her. A few months ago we asked her for the recipe, and after getting some great directions and pointers to make it, I went to look for a recipe I could do from scratch too.
After a little research, this recipe by David Lebovitz kept on popping up, and he said that he’d like it with a little more of a chocolate cake layer. So I changed the recipe a bit to get more chocolate… And an extra tip: Bake it in a Bundt Pan! Just make sure to properly grease the pan. Thoroughly. And when un-molding make sure to set loose the cake from the middle too.
An important step in this recipe is after baking, let it cool completely before trying to demold it. If it is still warm, it will collapse.
Make sure to get some sense of adventure and bake this! You won’t regret it. I got great reviews from the family!
Kitty
Chocolate Flan Cake
Recipe adapted from David Lebovitz
Serving Size: 8
Ingredients:
For the Candy:
¾ cup sugar
4 tablespoons hot water
For the Cake:
¾ cup sugar
1 cup all-purpose flour
⅓ cup unsweetened cocoa powder, preferably Dutch-process
½ teaspoon baking soda
¼ teaspoon baking powder
pinch of salt
½ cup buttermilk or plain whole milk yogurt
3 tablespoons vegetable oil
1 egg, at room temperature
½ teaspoon vanilla extract
For the Flan:
1 can evaporated milk, 12 ounces
1 can sweetened condensed milk, 14 ounces
4 eggs, at room temperature
½ teaspoon vanilla extract
½ teaspoon salt
Directions:
- Preheat the oven to 375ºF (190ºC.) Lightly brush or spray an 8-inch (20cm) porcelain mold or cake pan (not a springform pan) with oil.
- For the candy, pour the sugar on a pan and let it melt to a golden brown color, add the tablespoons of hot water one at the time to avoid it hardening.
- Pour the candy to the bottom of the pan.
- Place the mold or cake pan in a larger roasting pan, which you’ll use as a double boiler for baking.
- To make the cake layer, sift together the sugar, flour, cocoa powder, baking soda, baking powder, and salt in a large bowl.
- In a small bowl, whisk together the buttermilk, vegetable oil, 1 egg, and vanilla.
- Whisk together the wet ingredients into the larger bowl of dry ingredients, mixing just until combined. Scrape the batter in the mold, over the candy.
- Make the flan layer by blending together the evaporated and condensed milks, the 4 eggs, the vanilla, and salt, until smooth.
- Over the back of a large spoon (like a big mixing spoon), pour the flan mixture over the cake layer, using the spoon to diffuse the custard as you pour.
- Cover the mold or cake pan loosely with foil, fill the roasting pan with very hot water, so it reaches halfway up the side of the mold, and bake for 50 minutes, or until a knife inserted into the center comes out relatively clean.
- Once done, remove from the oven and carefully lift the custard out of the water bath wearing oven mitts, then let the flan cool to room temperature. Then refrigerate the flan until ready to serve.
- To serve, run a knife around the perimeter of the flan, then set a cake or dinner plate overturned on top of the mold or cake pan. Holding both the mold and the plate, flip the two simultaneously and shake gently, until you hear the flan release. Remove the mold. And remaining candy can be poured from the mold to the cake.
Note:
- The flan can be kept for up to three days in the refrigerator, but make sure it’s covered or it will dry out.
Have you made this recipe?
Please let me know how it turned out for you! Leave a comment below and share a picture with the hashtag #thefoodieskitchen
Want more?
You can subscribe to our newsletter and we’ll send you the monthly recipes! You can also keep up to date on Facebook, Twitter, Instagram, Pinterest, Tumblr or Snapchat.
© 2011 – 2020, The Foodies’ Kitchen. All rights reserved | Todos los derechos reservados
This post is also available in / Esta entrada también está disponible en ESPAÑOL (SPANISH)


Comments (1)
Rosana Padilla
October 9, 2011 at 10:59 pm
Hermosísimo el texto y ni se digan las fotos, se nota que quedó deliciosísimo el “Imposible”!!!! Yomi, yomi…
Kisses from México!!!